Getting Set Up on Omni CMS Web Editing
Welcome! If you're reading this, you are a new or existing user of MissionCollege.edu. Here's everything you need to get started.
What is a Content Management System? Simply Put, Use it to Edit a Webpage
The Content Management System (CM.S.) we use is called Omni CMS. Other examples of content management systems include WordPress, Squarespace, and Wix. As a subject matter expert, it's important to become literate in our CM.S. because you are the most qualified person to make sure that our web content is accurate and up-to-date.
For changes on the web aside from text edits, all you need to do is ask. Use our handy form.

At This Time, Telepathy is Not Available
Unfortunately, The Office of Marketing and Public Relations is unaware of needed content changes unless we explicitly informed. We are working on our supernatural abilities and may be able to assist via telepathy in the near future. Stay tuned for celestial updates.
- Please note: the marketing department has no admin access to Canvas or SharePoint. Please refer to the Office of Instruction for assistance with those platforms.
Content Editor Training - Omni CMS Software Tutorial
This complete guide for content editors is the best place to start.
1
Ask for a Username and Password
- Email the web manager to get set up with a username and password. You will receive these credentials in
an email.
- When you log in for the first time, you will be able to change your password to something
you can remember or manage more easily.
2
Logging In
- Navigate to the live web page you'd like to edit. For example, if your page is "https://missioncollege.edu/eops",
go to the page in your web browser as you would normally.
- Scroll down to the footer of your webpage.
- Click on the last four digits of our zipcode. This is a shortcut to get into the system
and directly onto the page you want to edit.
- Log in using your sign-on credentials. If you need credentials or need them to be
reset, email the web manager.

3
Editing a Page
- Click the filename for the page you want to edit.
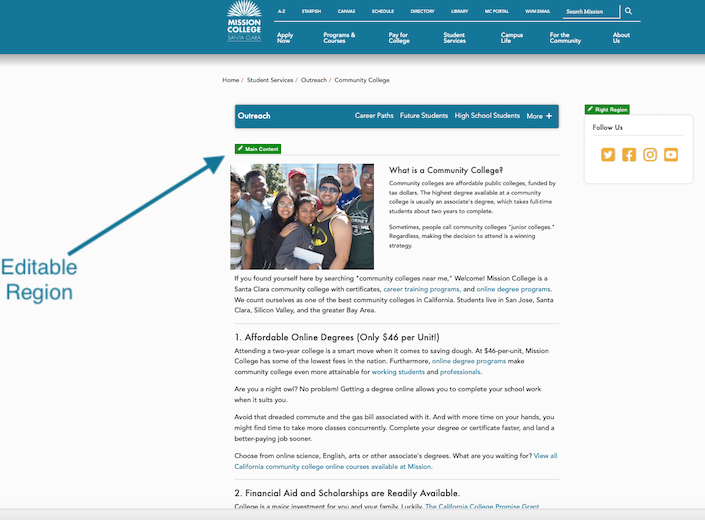
Click on a green, editable region button to open that region.
- If you don't see an editable region button, click the content to begin editing.
- Add, remove, or edit text using the What You See Is What You Get (WYSIWYG) toolbar.
Click on a green, editable region button to open that region.
What You Don't Need to Do Yourself
Coding. Seriously, not needed. You also don't need to change text color, bolding, font size, or any other visual elements on the page. Do not make new pages or groups of pages. Finally, ask for help when it comes to managing our menus.
What You Can Do Yourself
Changes to, removal of, and additions of event dates. Basic text changes that include, but not limited to, faculty credentials, program requirements, guest speakers at events, prices, etc.
- A brief note on file naming: file names must be lowercase, have no spaces in them, and have only dashes. Example: "important-dates-22.pdf" not "Important Dates_2022 .pdf". Remember to publish documents after you upload them.


